Note: If you prefer to watch a video on this topic, please visit our FloQademy FAQ course!
Table of Contents
Inline Editing via Admin SettingsBack to top ↑
The Reconciliations Settings page is accessible only to Admins and Managers. Here, you can control Reconciliations settings, add new accounts, and edit existing Reconciliations in bulk or individually. Admin and Manager users can update the Reconciliations for individual entities or all the entities they have access to directly from the Reconciliations Settings Page.
Access the Reconciliations Settings page by clicking the ellipsis and selecting “Settings” from the drop-down on the Reconciliations page or by clicking the gear symbol on the top right of the navigation banner.
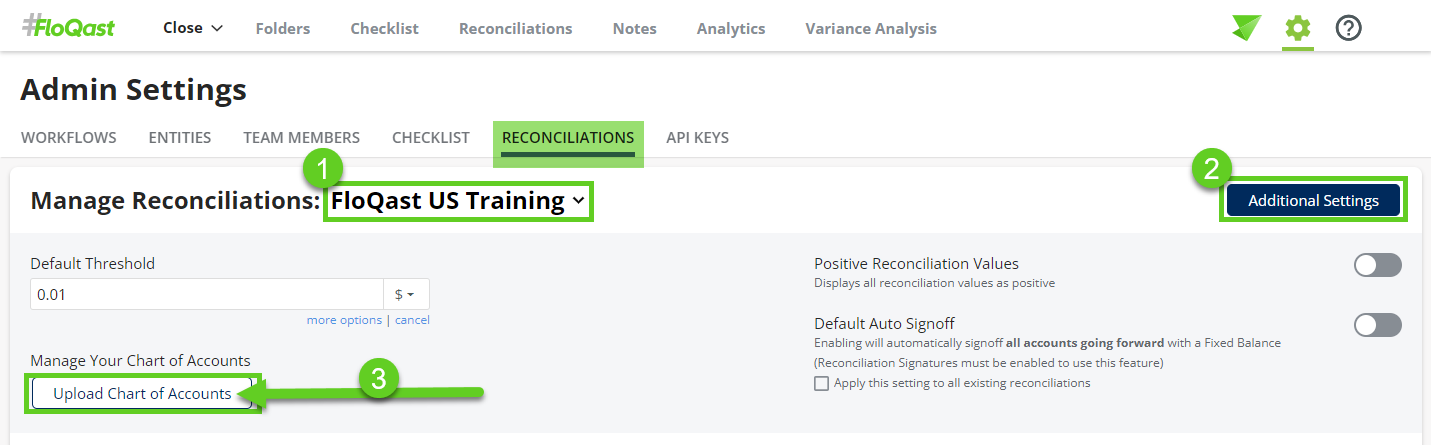
Reconciliation Settings section:

OR

Some of the settings you can set across your reconciliations include:
- Default Threshold – Set the materiality threshold for allowable differences between your GL balance and your Support balance for all Reconciliations. Differences below the threshold set will be considered immaterial, and therefore the account ties out. The Default Threshold will apply to all new Reconciliations you add, but you can enter a specific threshold on an account-by-account basis if any accounts call for it.
- Positive Reconciliation Value – Enabling “Positive Rec Value” will display all account balances from the General Ledger as positive. This option should be enabled if all account balances in the source documents are listed as positive values. This setting applies to all periods when enabled.
- Default Auto Signoff - Enabling this will automatically check the "Auto Signoff" box on each reconciliation that has a Fixed Balance entered.
Chart of Accounts
If you are an Intacct, NetSuite, SAP S/4 Hana Cloud, Microsoft Business Central, QBO, or Workday client, your chart of accounts will automatically be pulled into FloQast through the integration. Your list of GL accounts will appear when you click the “Add Account” drop-down.
If you are a TB upload client, you will supply your Chart of Accounts to FloQast via Excel/CSV file. A copy of this file can be found in your Cloud Storage environment under: FloQast FQ - Entity Name Chart of Accounts.
If you need to make changes to this COA file, you may either:
- Open that file directly in your Cloud Storage and edit the list
- Replace the file directly in your Cloud Storage with a new version (in the same expected format)
- Use the "Upload Chart of Accounts" button in FloQast Reconciliation Settings
Add New Account for Reconciliation:
Note: If you are adding one account or just a handful of accounts, we recommend using the Inline Addition feature. Read more here about Adding Accounts here.
You may also add a new Reconciliation by using the Add Account drop-down on the Reconciliation Settings page. Your entire list of eligible accounts (from your Chart of Accounts) will appear as options. Please be sure to confirm your Entity and Process Folder selection before clicking the Add Account button, because this is where your new account will be placed.

Edit settings on new/existing Reconciliation:
Note: If you are editing one account or just a handful of accounts, we recommend using the Inline Editing feature. Read more here about Editing Reconciliations here.
Users can also configure each reconciliation by completing the steps below:
1. Select the applicable folder which houses the Reconciliation:

2. From there, you can customize your Reconciliations for the following options:
- Frequency – Set how often the Reconciliation is completed (Monthly, Quarterly, Annual, or Custom).
- Currency – Select the local currency symbol to be displayed for the Reconciliation.
- Fixed Balance - This setting will allow for a Reconciliation to be completed without uploading a source document. This feature is beneficial for balance sheet accounts where changes are not expected month over month. A good example is a clearing account or a deposit balance.
- Auto Signoff - When enabled, this setting creates a system-generated sign-off for the preparers/reviewers of an account as the balance from the GL is the same as the Reconciliation value listed in the Fixed Balance field. No manual sign-off is required.
- Threshold – Change the materiality threshold for differences between the GL and Source Document.
- Assignee & Deadline – Add assignments (preparer/reviewer) and deadlines for each Reconciliation.
- Tags - assign organizational tags to specific Reconciliations. This is great for filtering.
- AutoRec Type - Choose between Standard, AutoRec Matching, and AutoRec Amortization. See in-depth articles on FQ AutoRec here:
- Estimated Time - To assist with task planning and prioritization, you can enter estimated time per assignee in hh:mm format. (NOTE: This feature is OPTIONAL. If this is not yet enabled on your account and you would like to opt in, please contact your FloQast ASM or support@floqast.com to inquire about enabling it for your account.)
Making Bulk Edits to ReconciliationsBack to top ↑
If you need to make many changes or additions to your list of Reconciliations, you can export your Reconciliations to an Excel template. You can export and revise reconciliation items for a single entity, or all entities at once by selecting “All Entities” in the drop-down. From this template, you can edit all of the settings referenced above and then re-upload your template via the Upload Template button.

When making changes to your template, there are some important things to keep in mind:
- Please do not remove/edit the Internal IDs. These are important for the system to track your Reconciliation from one month to the next.
- Please do not remove/add any columns to the template. You may leave certain cells blank if a column does not pertain to your Reconciliation.
- If you would like to add a brand new Reconciliation, you may fill in the appropriate columns and leave the Internal ID column blank. The system will recognize that it's new and assign an ID automatically. Please be sure to match the format of the existing Reconciliations when adding something new (i.e. assignees in email form, due dates in business date format, etc.)
- If you would like to delete an existing Reconciliation, you may delete the entire row that the account appears in.
- Please re-upload your entire template (not just the accounts you are editing). Deleting a row indicates that you'd like to remove the Reconciliation from FloQast (referenced above in #3) so please be sure that your full list is re-uploaded.
- The file will export to .xlsx format and should be re-uploaded in .xlsx. Uploading a .csv could return an error for you.
- When editing an "All Entities" template, you might come across columns that aren't relevant to your ERP or configuration. The headers of these columns will indicate which ERP the settings pertain to. If a column is labeled with an ERP you don't use, please leave it blank instead of entering information.
The original template copy you download and upload is automatically saved in your storage provider. The Reconciliation Template folder stores these versions for review or rollback if needed. If you wish to keep the All Entities template with all entities in one file, save it locally for future reference, as each entity's template will be archived separately.

Save and Apply Changes
When you are done making your individual edits, you'll finalize your settings by clicking “Save and Apply Changes”.
When you have uploaded a new template, you'll finalize your settings by clicking “Save and Apply”.
Your settings will automatically apply to the current calendar month and forward. When you save changes, you will also be given the option to apply retroactively to prior periods.
Please note that your entire template will be applied to these historical periods (not just changes/additions that you just made). Therefore, only apply your template this way if you'd like the entirety of the Reconciliations and settings to be applied. If you would like to make a one-off change in a historical period, please use the Inline Editing feature.

Note: As a control feature in FQ we do not remove sign-offs or apply settings changes if the Reconciliation account has been signed off on. Revised settings are also not applied to Reconciliations in Locked Folders.